Denne skrev jeg et annet sted en gang. Kanskje det kan komme til nytte her:
TONEARM AND CARTRIDGE GEOMETRY AND SETUP
PREFACE
This may all look a little daunting at first, but whether you want to get to the bottom of how a turntable works, wonder if you are able to swap the cartridge on that old Rega yourself or if you just want to give a turntable a little tune-up, a little knowledge is never a bad thing.
All it takes is a little patience and a cardboard protractor, so dig in!
I recommend using the drawing in Fig. 1 as a visual aid throughout the article.
BACKGROUND
The significant majority of all turntables ever made use a radial tonearm. That means the tonearm is mounted outside the platter, rotating around an axis parallel to the platter’s rotational axis. Its pivot point is usually also on this axis. (See Fig. 1)
This means that the cartridge moves across the grooved surface of a record in an arc, and that the cartridge and stylus is practically never parallel/tangential to the grooves. When it isn’t, it causes some degree of tracking (angle) error and tracking error distortion. What we want is to arrange the tonearm and cartridge in a way that minimises that tracking error distortion as much as possible. …To find the best possible compromise.
“Tracking”, by the way, is the stylus’ ability to precisely read the shape of the grooves.
(Tangential tonearms, on the other hand, travel in a linear motion and have the stylus mounted with no overhang, always parallel to the groove tangent. These have no tracking angle error and no skating. They do however have other design challenges. Anyway, we will concentrate on radial tonearms in this article.)
You may have heard the names H.G. Baerwald, Erik Löfgren and J.K. Stevenson in the context of turntables. Those are the authors of the three best known publications about cartridge alignment. They each developed a set of equations to calculate the cartridge and tonearm geometry and a philosophy (or “goal” if you prefer) for how to apply them.
When the stylus travels across the record in an arc, there can be a maximum of two points where it is exactly parallel with (tangential to) the grooves, where there is no tracking error. These two points are called null points.
The Löfgren (B) equations minimise distortion/tracking error between the null points.
The Stevenson alignment aims to compensate for inner groove distortion (Lower resolution and more difficult tracking because of lower groove speed at the inner grooves.) by placing a null point at the inner groove, at the cost of more tracking error distortion over the rest of the record surface.
Baerwald’s philosophy and equations minimise the average tracking error distortion across the whole record. This solution was actually published before, by Löfgren, and is sometimes called “Löfgren A”.
These are all simply variations of the same calculations, and they are not the only ones. Japanese turntable (or rather “tonearm”) manufacturers normally use a slightly different variant, for example. Your tonearm will be designed around one of these calculations/philosophies.
Sometimes, a tonearm will allow you to experiment with different alignments, and sometimes, you need to stick with the geometry your tonearm was designed for. That is a pretty safe option anyway, all things considered.
All the alignment equations take the tonearm’s mounting distance (Spindle To Pivot) and the chosen radius of a records’s inner and outer grooves as input, and return two radiuses where the null points should be. At which the cartridge should be parallel to the groove tangent, that is.
The overhang and offset angle are products of these.
Using a small inner groove radius will require trying to limit the tracking error over a larger area, making the average/worst case tracking distortion worse.
Modern records have quite a bit of run out grooves (dead wax) near the label, so it probably makes sense to downplay those crammed full fifties classical records and top of the pops compilations.
It’s worth pointing out that for radial tonearms, a longer tonearm (longer “effective length”) means less tracking error and smaller offset angle. (For the sake of simplicity, in this article we will treat offset angle and zenith as the same. To be exact, the offset angle is a design parameter in the tonearm and the zenith angle is the mounting angle of the cartridge.)
Another thing to be aware of is that tangential tonearms - that move along a linear path, with no overhang - keeps the cartridge parallel to the groove tangent at all times, and have no inherent tracking error. They do however have other challenges for the designer to overcome.
So, how do we put all this to use?
CHOOSING A CARTRIDGE
For finding a cartridge that matches your tonearm (and system), please read the “Compatibility” chapter of our “How To Buy A Phono Cartridge” article.
ALIGNING THE CARTRIDGE
-By overhang
Maybe the simplest way of aligning the cartridge is to mount it perfectly straight in (parallel to) the headshell with the manufacturer’s specified overhang. In theory, that means you’re aligned with the null points your tonearm was designed for.
Some turntables/tonearms (like the old workhorse, Technics SL-1200) even come with a gauge/template to help with this. It’s easy and it works fine.
-“Stupid” protractors
These are generic (usually cardboard) protractors with a spindle hole and one or two grids/points for aligning the cartridge to generic null points at a given overhang. It is hard to see a reason to use one of these.
-Turntable/tonearm specific protractors
These look like the “stupid protractors”, but have the null ponts placed correctly based on the mounting distance and geometry of a specific tonearm. This is the kind of thing that will be included when you purchase a turntable or tonearm.
-Arc protractors
Arc protractors are a precise and quick way to perfect alignment. They have a spindle hole, two null points with grids and an arc between the points. When the stylus hits both null points, aligns with both grids and follows the line between them, everything is perfect. They are simple to work with once you get the hang of it, and very reliable.
-“High End” store bought protractors
Universal, high quality protractors are available to buy. Like the Dr. Feickert NG Protractor. Needless to say, these are expensive. They generally work by putting them on the platter/spindle, adjusting the mounting distance and lining them up with the tonearm to show you where your null points/angles are. They are very reliable, easy to work with, nice looking and cool, but at $250 and thereabouts, I guess you need to have a special interest, or just to work a LOT on turntables. They are quality tools of course, and owning such equipment could bring some people joy in itself.
-Conrad Hoffman’s Template Generator (!)
THIS is the trump card. (No, no. Not Donald!) Conrad Hoffman wrote a small windows program that is available for free from his website. (Link below). With it, you can print your own arc protractor for your specific turntable, inputting your tonearm’s mounting distance (pivot to spindle) and the inner and outer groove radiuses you see fit. It lets you check and calibrate for any scale errors in your printer. When you’re satisfied, print one out on photo paper, or even laminate it, and you’ll have a free protractor that is just as good as ANY other.
It lets you play around with angles, radiuses and alignment standards to your nerdy heart’s content. …And if you read up a little on it in the Vinylengine thread (Link also below), you will learn a lot along the way.
My personal favourite is a Baerwald protractor with “typical” radiuses (The template generator has a setting for conservative, typical values used on records for the last few decades, letting you optimise for the records you’re probably playing.) and a mounting distance 2 mm further out than specified by my tonearm’s manufacturer. (My turntable has an adjustable armboard). I love that Conrad Hoffman’s Template Generator lets me do this.
I strongly recommend looking into this one!
VERTICAL TRACKING FORCE (VTF)
The VTF is the force with which the stylus is pushed down into the grooves. It is measured in grams, and the correct value is specified by the cartridge manufacturer. Generally, tracking is improved by aiming for the higher end of the recommended spectrum.
You should probably try to get the VTF in the right ballpark even before aligning the cartridge, then properly adjusting it when that is done.
Most tonearms are like pivoted, lopsided seesaws with the cartridge at the long end and an adjustable counterweight in the short end. This design is what we’ll assume in this article.
If you have a scale for setting the VTF, then you could simply use that instead. If not, this is how to do it from scratch: (Which makes sense to do on a first time setup anyway.)
First we have to balance the tonearm. Be careful not to damage the stylus!
-Remove any stylus guard you might have.
-Make sure the Anti-skating is set to zero.
-Lift the arm off the arm rest by the finger handle which is most likely on the side of your headshell. (The part of the tonearm where the cartridge is attached.) Do not use the turntable’s arm lift mechanism. That will make what we are trying to do impossible.
-Hold the cartridge over the record surface, then adjust the counterweight to find the arm’s equilibrium. It should “float” by itself without either the cartridge or the counterweight dropping down. At this point, your VTF is zero.
-Then place the arm back on the arm rest. Lock it there if you have that option.
-Now, hold the counterweight so it doesn’t move and reset the scale on the end of it to zero. …To calibrate the scale to show zero grams when the VTF is zero.
-Finally, turn the counterweight (with the scale this time, of course) outwards until the scale shows the VTF you want. If you want 2 grams, it should point to “2”.
If you have that VTF scale we talked about, check your setting with that.
Some counterweights have locking mechanisms or set screws securing them. If that’s the case with your turntable, figuring that out is a task left to the reader.
That’s it. VTF all set. (For now.)
ANTI-SKATING
What is Anti-skating? Well, it’s the opposite of skating, of course! (Ha, ha.)
On conventional radial tonearms with an overhung cartridge, the frictional force (drag) between the stylus and the record surface pulls the stylus towards the spindle. (See Fig. 1) That is called “skating”. A tonearm’s anti-skating mechanism counteracts this. An opposite force is applied to try to balance the skating force.
We want the stylus to ride in the centre of the groove with equal pressure to the inner groove (left channel) and outer groove (right channel). With too little anti-skating, the stylus will be pushed towards the inner groove, which limits tracking ability in the left channel. Too much anti-skating pushes the stylus towards the outer groove, limiting tracking ability in the right channel. When Anti-skating is correctly balanced, both channels break up into distortion at the same time (at the same level of groove complexity).
The skating force varies with VTF, the distance to the spindle, groove speed, to a degree: groove complexity/amplitude, etc. Anti-skating will always be a compromise, and never “perfect”
The anti-skating on a tonearm is usually a spring loaded mechanism, or a suspended weight. The dial on the spring loaded ones are often marked with the same scale as your VTF, so you can set it to correspond with that. Many feel that most manufacturers overdo it a little, so it might be better to set it a little below that.
Another way to set anti-skating is to drop the stylus down on a record with no grooves, about ⅓ to ½ the way in on the area where the grooves normally are. If the cartridge moves (skates) towards the label, you need more anti-skating. If it moves outwards, you have too much. If it stays still, you have the right setting. …But remember, if you lower the stylus 1cm further in or out, it will move again. It’s about finding the best compromise. Some find that a little less anti-skating is preferable, and want the cart to move slowly against the spindle when you drop the stylus about a third of the way in on the record. Anyway, It’s not a huge thing under normal circumstances. Get it in the ballpark and leave it.
There are also test records available, for testing tracking ability, azimuth, anti-skating, etc. They have special tracks with tougher and tougher tracking, where you listen for when the distortion kicks in in each channel to help with setting your anti-skating.
VERTICAL TRACKING ANGLE (VTA)
When a master for pressing vinyl records is cut in a cutting lathe, the cutting head sits at a certain angle. To maximise the stylus’ contact area with the grooves, we want its VTA to match that angle as closely as possible.
To make a long story short, in 99.9% of the cases, to do that we aim to get the top of the cartridge, or easier still: the arm tube, parallel to the platter. For all intents and purposes, that gives us a neutral VTA. (When the arm is lower in the pivot end, the VTA is negative, and when it’s lower in the cartridge end, the VTA is positive.)
Some people insist that VTA is not as important, nor as accurate, as concentrating on the SRA (Stylus Rake Angle). …Which technically is correct, but in my opinion, for all intents and purposes, the difference is negligible. Working with this includes microscopes and special software. Let's not go there right now.
Tonearms may or may not have adjustable VTA. Those that do will have a way of adjusting the height of the pivot (rear). Some have a set screw that you loosen to lift the whole arm in it’s mounting sleeve. Others have a big dial around the base, or some other method. It varies. If there is no adjustable VTA on a tonearm, it can be done with shims under the arm mount, shims between the headshell and cartridge or platter mats with different thicknesses. …If necessary.
I personally like to set the VTA by levelling the arm tube on a thin, 130 gram record. That way, the VTA will be ever so slightly negative on a 180g record. This will accentuate the bass a little. (Very little.) And yes. The thickness of records will cause the VTA to vary. Nothing to worry about. It’s a miniscule change, but when doing it the way I prefer, it will vary between neutral and negative.
AZIMUTH (HTA)
The Azimuth, or horizontal tracking angle, is the angle with which the stylus/cantilever hits the record, when seen directly from the front. Of course we want this to be perpendicular. The reason that this adjustment even exists, is that on many cartridges (which more often than you’d think are handmade) the cantilever exits the cartridge housing at a slightly incorrect angle.
Personally, I would deem such a cartridge as defective and send it back, but that's another discussion.
HTA can be set by simply levelling the headshell with a tiny spirit level or a transparent ruler with horizontal lines. These tools are available from hi-fi stores, or can simply be made. A transparent plastic card with etched lines parallel to the edge, for instance,is great for setting both VTA and HTA.
Another way is to lower the stylus onto a mirror. That way you’ll see easily if it’s straight.
It may be worth mentioning that if you do experiment with alignments and radiuses like I mentioned earlier, and you end up with a cartridge that is not completely parallel to the headshell, some may point out that this will cause the HTA to vary with the thickness of records, and with VTA. …and technically they will be correct. However: That variation will be such a miniscule amount that it’s 100% negligible. WAY less than the precision/tolerance you’ll achieve when aligning a cartridge and setting up a turntable with your hands. This can safely be ignored.
RE-CHECK YOUR VTF
Some of these adjustments may slightly affect your VTF, so it is a good idea to re-check your VTF once you are done with everything else.
CONCLUSION
Congratulations! For finishing setting up your tonearm and cartridge, or just for sticking with me until the end of the article. Now, go enjoy your records, hopefully played on a perfectly set up turntable!
Useful resources
http://www.conradhoffman.com/chsw.htm
https://www.vinylengine.com/turntable_forum/viewtopic.php...
https://www.vinylengine.com/protractor-user-guide.shtml
https://www.vinylengine.com/tonearm_alignment_calculator...
https://www.vinylengine.com/cartridge-alignment...
http://www.helices.org/auDio/turnTable/stevenson.pdf
http://www.helices.org/auDio/turnTable/lofgren.pdf
http://www.helices.org/auDio/turnTable/bauer.pdf
http://www.helices.org/auDio/turnTable/baerwald.pdf

 Morsomme her. De eneste jeg trengte å stille azimuth på var de headshellene man kunne gjøre det på. Go figure...
 Husker ikke hvordan den var første gangen jeg fiklet med den
 Det er kanskje trøttende at jeg tværer på ting noen mener er uten særlig betydning for sluttresultatet, men jeg har vært opptatt av å få innstillingen av pickupen så bra jeg kunne. Derfor nerdingen.

 Jeg prøver å aligne så godt jeg kan, optisk. men observerer det samme som Korf… den forventede fasongen med 2 minima i forvregning er vanskelig å se ved målinger. Har fått noen som ligner en gang ,men generelt er det slik at Forvregningen øker mot sentrum og andre ting overskygger HTA feilen antagelig..spesielt om man har koniske stifter er forvregning vs radius så høy at det overskygger alt annet. Stor VTA feil ødelegger alt..det finnes pickuper som leveres med avvik på 8-10 grader her.
korfaudio.com
Sist redigert:Har også tenkt at jeg kanskje burde justere pickupen litt bakover i headshellet, slik at den passer nøyaktig til Korf gauge. Siden denne fulgte med armen bør den vel gi riktig innstilling. Regner da med at jeg også kan glemme å bekymre meg for disse nullpunktene og pickupens vinkling i disse. I tillegg unngår jeg å måtte vri pickupen i headshellet.Som antydet før, det er veldig lite som er «100% rett eller galt» og null-/tangeringspunkter får du. Gitt avstanden mellom spindel og arm, så har plasseringen av null-/tangeringspunktene på plateradien konsekvenser for overheng og offsetvinkel. Her er tabellen fra fra innlegg #64, med sammenlikning av std.geometrien til Jelco 750D, opp mot Løfgren A/Baerwald, Løfgren B og Stevenson, gitt 214 mm avstand mellom spindel og arm. Jeg har fremhevet overheng, offsett, og nullpunkter.
 Denne skrev jeg et annet sted en gang. Kanskje det kan komme til nytte her:


 Jeg bruker
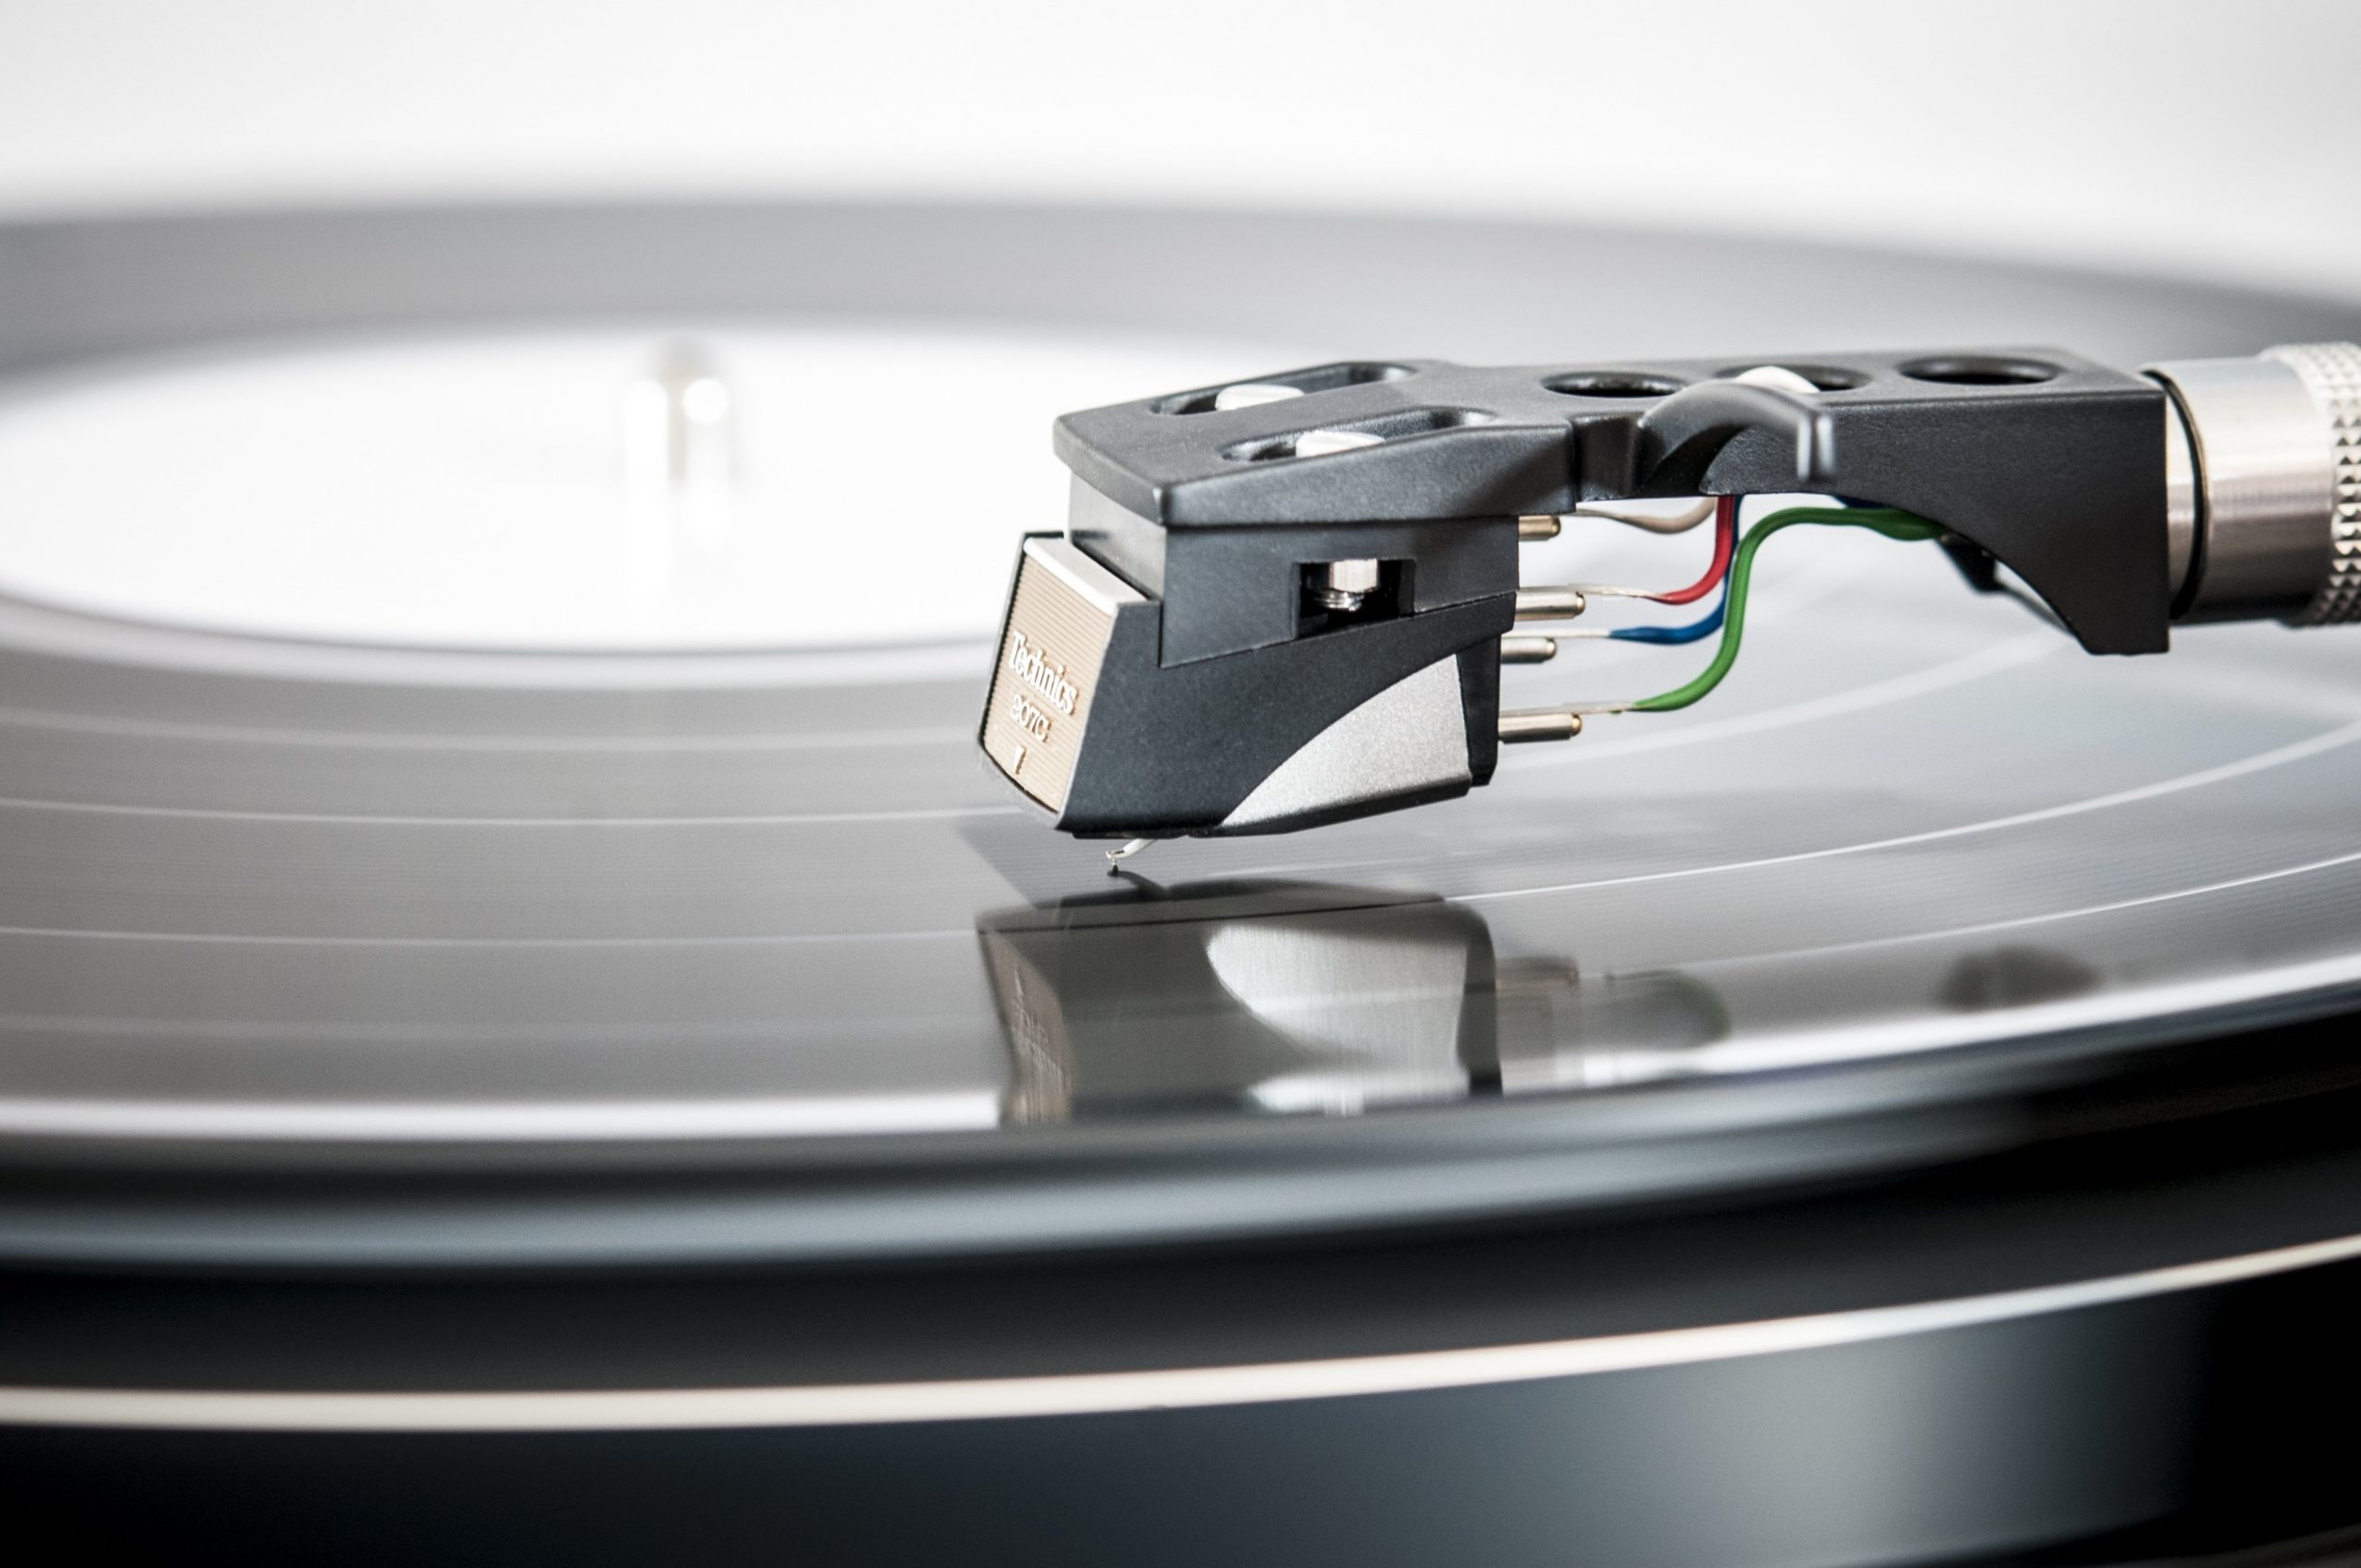
 alignmentprotractor.com
 Endelig en unnskyldning man kan bruke for å plukke opp Whams "Make it Big".